
Macintosh Information
This is a page of general information on Macintosh computers and the Macintosh OS X. This information does not apply to anything Windows related.
General Information:
Closing Programs:
To truly close a program on a Mac, one needs to quit the program. If you simply click on the red “x” in the upper right corner, it doesn’t close the program- it continues to run in the background but the window disappears. A good example of this is when you play a song on the application iTunes and then click on the red “x” but the song is still playing after the window closes. You have to right click on the application icon and choose to quit the application from the pop-up menu that appears. Another way to quit the program is by using the combination of the command key and the q key (command +q).
Apple/Command Key:
This key helps “command” the apple computer to do things. You hold it down while pressing another specific key to execute an operation. Command + (Key) combinations are shorthand for menu choices.
Ejecting Drives:
To eject a drive from a Macintosh computer you will need to either drag the drive icon into the trash, right click on the drive icon and select “eject”, or open the hard drive file and select eject from the left hand column.
Applications:
The Macintosh applications are software applications for your Macintosh computer. The App Store is where you can find and download additional applications. These applications can be downloaded through the app store where you would have needed a software disk in the past. For example, things like word processors and photo editors are applications.
Dock:
The dock is the blue bar that is defaulted to be located along the bottom of your screen. The dock can be moved to either side of the window or even hidden from view. It holds shortcuts to things like your trash, folders, and many applications. You can load things on your dock by dragging and dropping the application onto the dock or by right clicking on the application and choose “Add to Dock”. If an application is running it will have either have a blue light or a black arrow under the icon on the dock.
System Preferences:
System Preferences is an application within the Macintosh computers that allows users to modify various system settings. These settings are divided into separate groups by their relativity with each other. The system preferences application allows users to modify software and hardware settings. An in-depth list of the options to modify within the system preferences is available online for further explanation.
Get Info:
This is an option that becomes available when right clicking on a document or application. This essentially provides properties and information about the file, including size, name, extension, and what program automatically opens when clicking on the file.
Z-Drive:
Registered students are allocated their own personal share on a network server. This means every student is allowed up to 200 MB of disk space on a server. You can save your work to this account and only you have access to it from any student computer lab. This is the most secure way to save and we highly recommend that you take full advantage of it. Note: Setting up a VPN is required now to access your Z Drive from off-campus.
With that being said, the Z-drive should be accessed on the dock for the students that log in to the Macintoshes on campus. The Macs should automatically mount the “Students” share on the desktop and place their z-drive towards the right of the dock next to the trash. If you cannot find it on a Macintosh on campus the instructions for connecting to a z-drive are available at Z-Drive.
Finding Files or Applications with Spotlight:
If you’re looking for a file or application and you aren’t sure where to find it a helpful Macintosh tool is Spotlight. Spotlight lets you search through all the things on your Macintosh computer. The spotlight magnifying glass is in the upper right corner of your Macintosh. You can either click on the magnifying glass or press Command + Space bar to bring up the search box. Type in the application or file that you are looking for (Spotlight also has as dictionary built in which is neat if you’re looking for a definition) and click on the search result that you need.
Connecting to Windows Servers:
Connecting to a windows server or windows shares can be done by
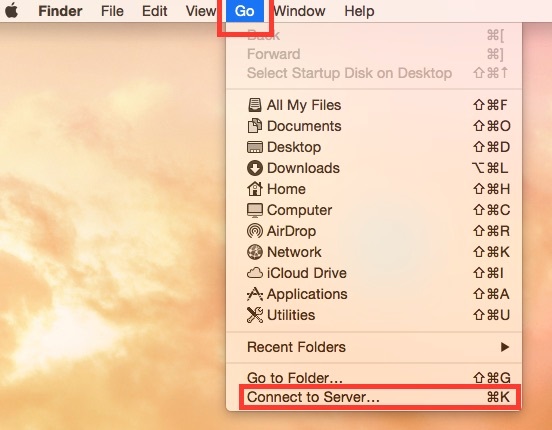
1. Making sure the finder is active (click on the desktop/ minimize or exit any applications that are running) and pressing Command + k. You can also go to “Go” and then “Connect to Server”
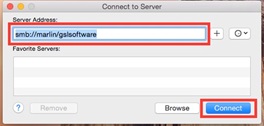
2. To connect to a windows share you’ll need to make sure smb:// is in front of the server name that you want to connect with. The “smb://” is a protocol for sharing files, printers, serial ports, and communication abstractions. This is the language that the Microsoft Windows Network runs in and enables users on Macintosh computers to share files with Windows computers. A few examples are:
a. Caddis: smb://caddis.msu.montana.edu
b. Hopper: smb://hopper.msu.montana.edu
i. Common Shares for the Student Labs are:
1. smb://caddis.msu.montana.edu/pccommon
2. smb://caddis.msu.montana.edu/pccommon/usa
3. smb://caddis.msu.montana.edu/
4. smb://hopper.msu.montana.edu/msuapp
5. smb://hopper.msu.montana.edu/labshare
6. smb://archserver2.msu.montana.edu/ (This is the share for Architecture)
3. After you’ve typed in the share hit enter or click “connect”. A dialogue box will appear allowing you to select the share you want to connect to. Select the share and click ok. This will mount the share to the desktop and display the share in a new finder window.
|
|
|
Printing:
When a user tries to print from a lab, the printers should already be loaded onto the Macintosh. It will prompt the user to put in their username and password but it’s already loaded with a username that will not work. The user should go ahead and replace it with their NetID and corresponding password – the same credentials they used to log on to the Macintosh.
To print on both sides: In the print menu, in the 3rd drop down box, select “Layout” and then select “Long-edge binding”.
To Add a Printer: Please visit the instructions list for Macintosh at How to Add a Printer
Starting Macintosh in Safe-Mode:
1. Make sure the computer is off
2. Hit the power button
3. After the start up tone hold the shift key.
4. Continue to hold the shift key until the Apple logo appears and you see the spinning process wheel below it.
Starting Macintosh into Windows if Bootcamped:
1. Make sure the computer is off
2. Hit the power button
3. After the start up tone hold the Option key
4. Select Windows Hard Drive Icon
5. Hit Enter and Windows should boot.
Helpful Keystrokes:
Program Quit: Command + Q (when the program you want to close is active)
Hide Program: Command + H
Cycle through Programs: Command + Tab
Cycle through windows of a program: Command + Tilda (‘ or ~)
Take a screenshot: Command + Shift + 3 (this will auto-save to your desktop)
Take a screen-grab of a small area: Command + Shift + 4 (this will auto-save to your desktop)
Logout: Command + Shift + Q
Force quit: Option + Command + Esc
Open the “Connect to Server” Dialog: Command + k (when finder is active)
Fast Shutdown: Ctrl + open cd button
Quick look: Highlight a file and hit spacebar
For more – http://support.apple.com/kb/HT1343